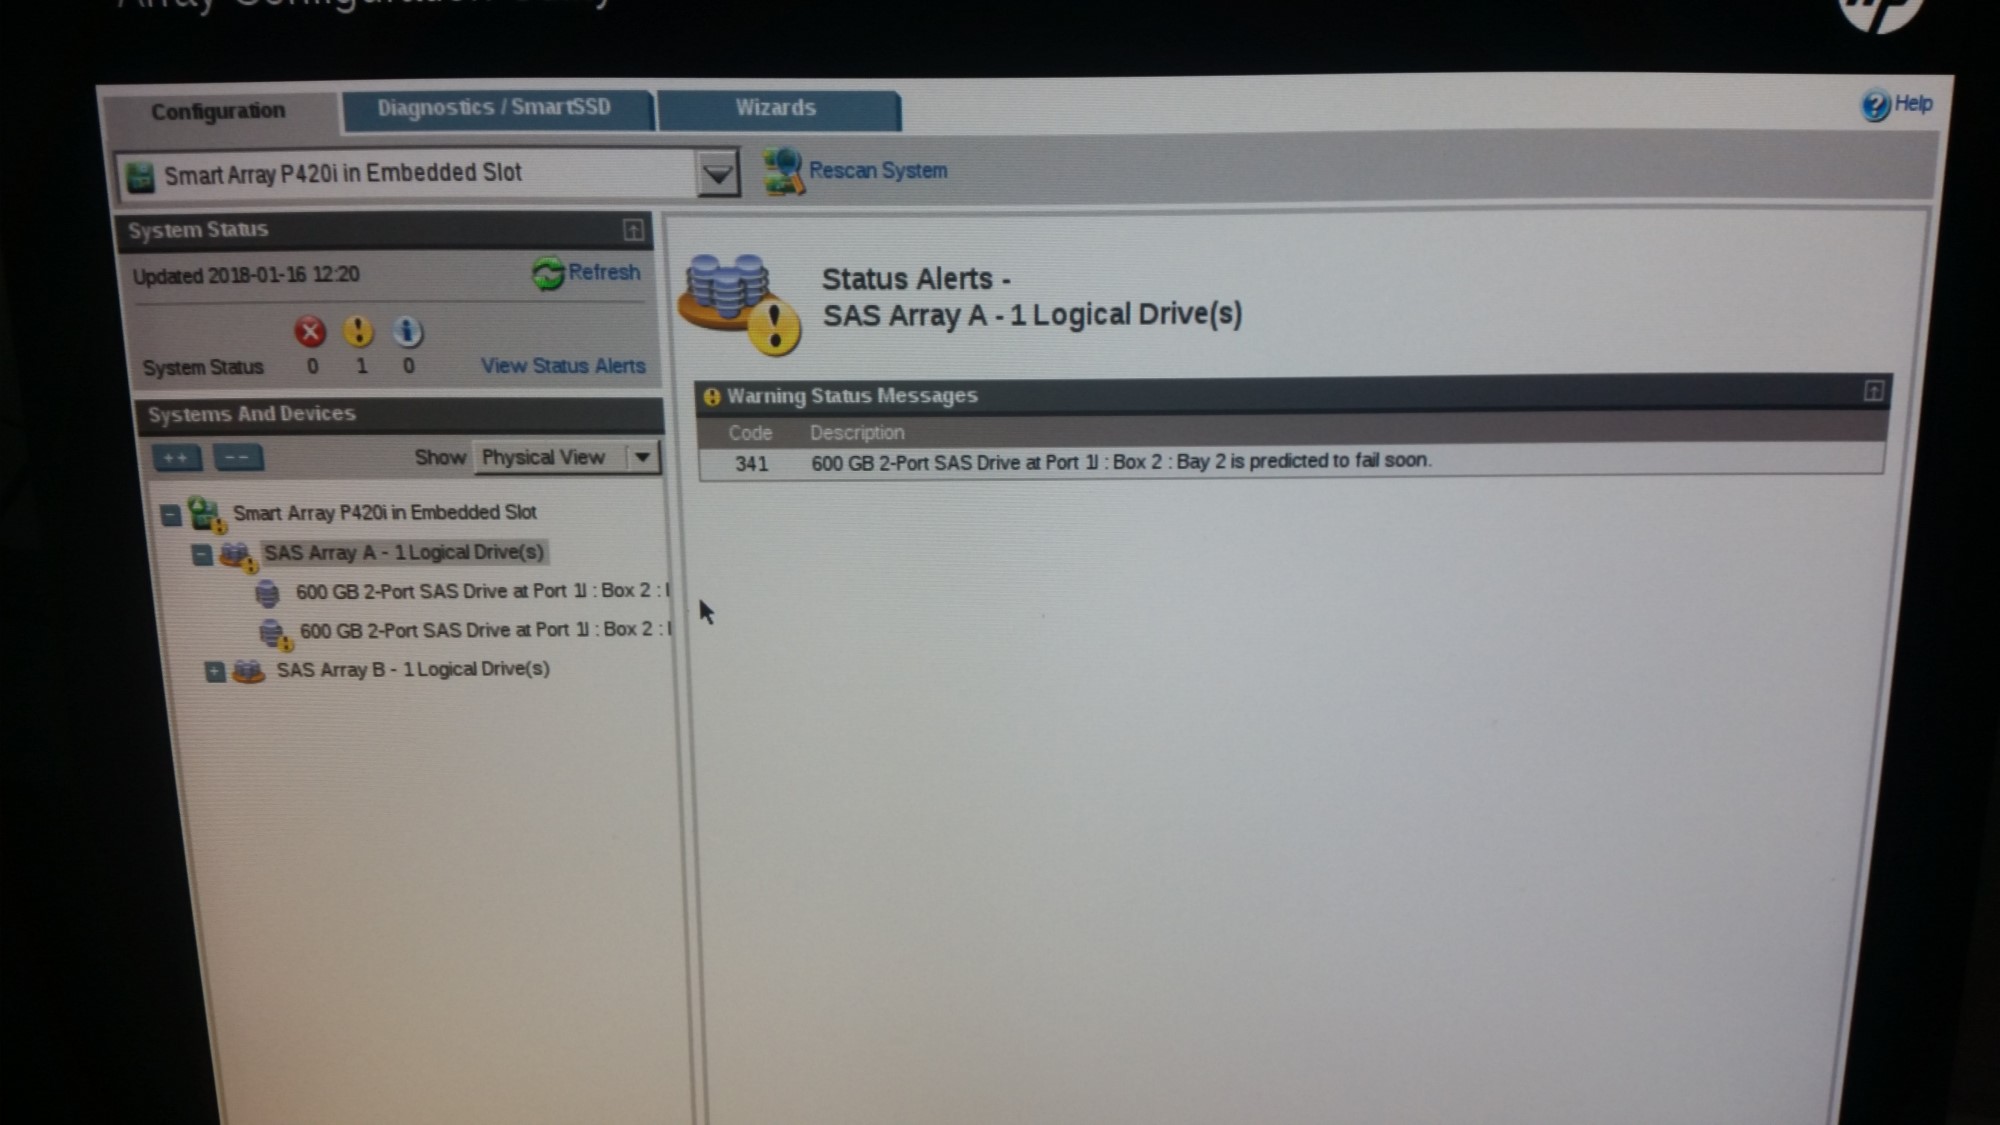
Over the last few years, backing up my IT infrastructure has become more and more complex. Initially it started with simple backups to USB drives using automated scripts with some rsync commands. Today, my backup strategy follows a sophisticated approach that includes both hot and cold backups, storing data at several locations and at least on two technologies, including HDDs, magnetic tapes (LTO) and cloud storage. One major drawback of my current setup is the lack of ability to back up my virtual machines running on my VMware vSphere Hypervisor infrastructure. With more than 30 VMs in production, manually restoring and reconfiguring all Windows and Linux machines would be a nightmare. I have enough experience dealing with status alert messages popping up in the middle of the night while trying to get the system up and running again. These can be caused by hardware problems (HDDs / SSDs and RAID controllers) but also software issues or simply an update. That’s why a virtual machine backup solution for my infrastructure must be deployed. It’s always a matter of when, not if, something goes wrong. Especially for systems running 24/7 under high workload.
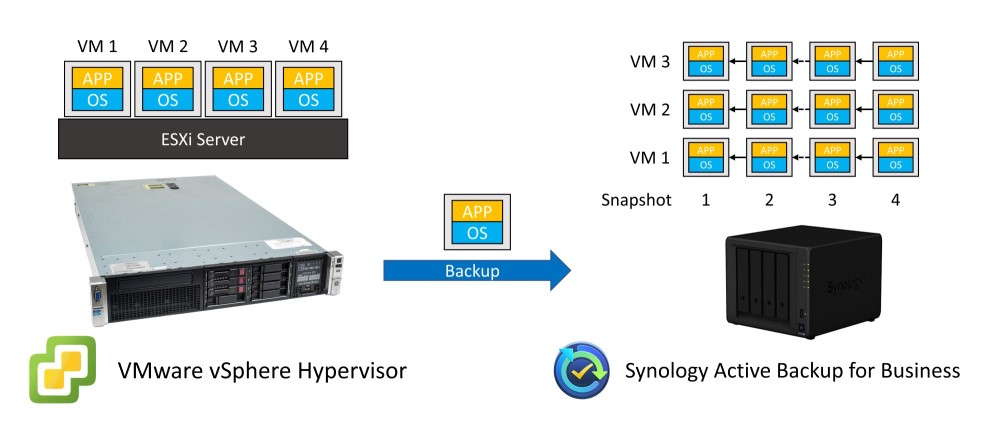
This post therefore addresses the necessary steps to perform automated backups of entire VMs running on VMware vSphere Hypervisor using Active Backup for Business running on a Synology Diskstation DS918+. The Active Backup for Business (ABB) package is a free backup and recovery solution from Synology that can be used for physical hosts, file servers and virtual machines (VMware and Hyper-V). It enables fully automated backups of running VMs, which are stored incrementally as snapshot on the Diskstation. The following figure illustrates the targeted backup solution graphically.
Preparations on VMware vSphere Hypervisor
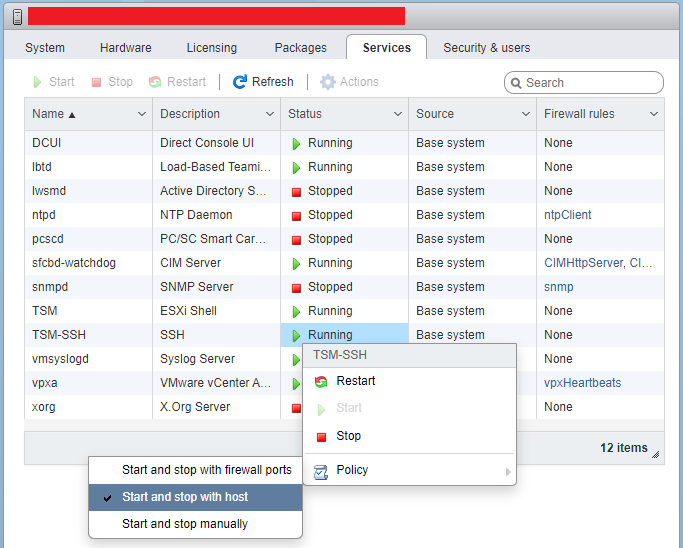
First, the shell and SSH interface on the VMware vSphere Hypervisor must be enabled and switched to start with host. This can be done on the web interface of the hypervisor under Host -> Manage -> Services as shown in the figure below.
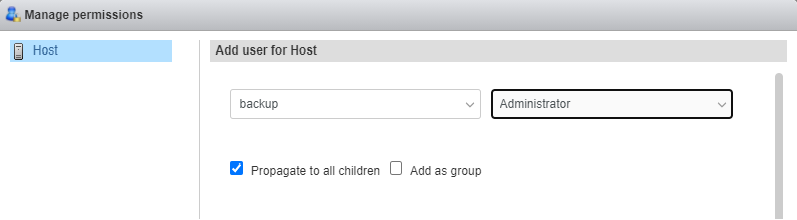
A separate user with the appropriate rights is created for the backup job. This is achieved by creating the user named backup under Host -> Manage -> Security & users -> Users. The first idea was to create a dedicated role named Backup-role under Host -> Manage -> Security & users -> Roles. Unfortunately, the shell and SSH permissions cannot be selected in the role menu as privileges, which means that the backup cannot be executed on the Diskstation. As workaround the preconfigured role Administrator needs to be assigned to the backup user. Doing this on the hypervisor is not as intuitive, as this menu is in a different location, namely Host -> Actions -> Permissions. The user backup and the role Administrator are selected from the dropout menu. Furthermore, the checkbox Propagate to all children is enabled as shown in the figure below.
Preparations on Synology Diskstation
In a next step the Synology Diskstation is prepared. First, a shared folder named ActiveBackupforBusiness is created on the Diskstation, where the VM backup files of the hypervisor are stored.
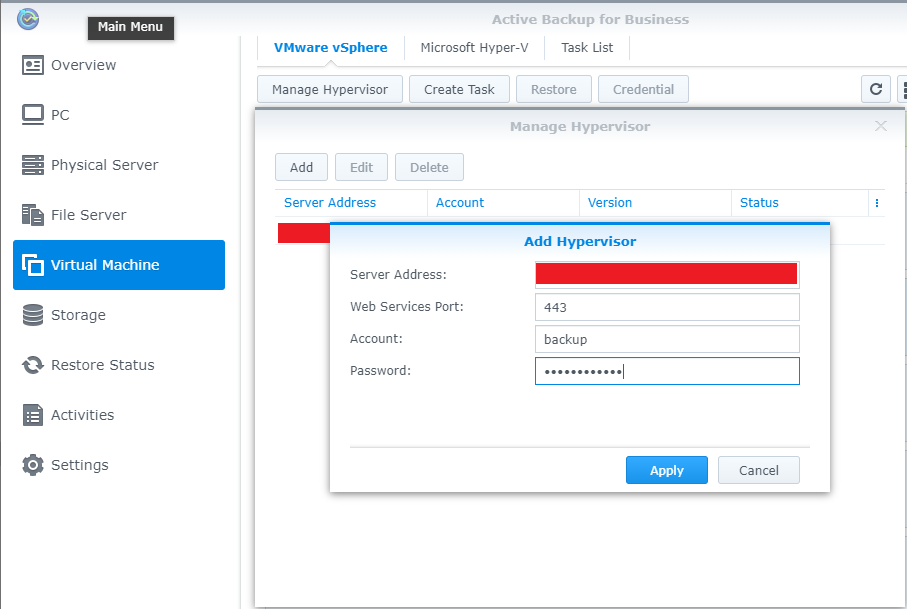
Afterwards, Acitve Backup for Business and the required packages are installed on the Diskstation using the Package Center. After the installation is completed, a new connection to the vSphere Hypervisor is established under Virtual Machine -> VMware vSphere -> Manage Hypervisor -> Add. The IP address or FQDN and the credentials for the backup user we created on the hypervisor are added as shown in the subsequent image.
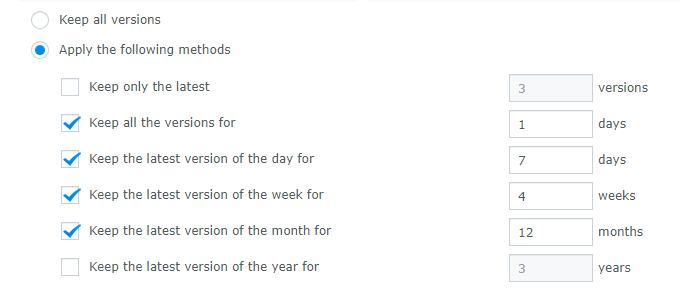
Then the task is created that automatically takes a snapshot and stores the data on the Diskstation. Click Create Task under Virtual Machine -> VMware vSphere and select the previous created folder ActiveBackupforBusiness as backup destination. Then select the VMs for which the backup should be performed. Additional VMs can be selected or deselected later by editing the backup task. Make sure the checkbox Enable Changed Block Tracking is enabled to reduce the transferred data size. This setting requires further manual configurations for each selected VM which will be discussed in the following section. Next, the schedule and the retention policy of the backup task is configured. A good approach is to perform the backup after midnight and keep the backups according to the policy below. Thus, for the past week every day, for the past month every week, for the past year every month and for every past year a backup is created. Finally, the restore privileges can be granted to the desired Synology users.
Configuring the Virtual Machine for the Backup Task
As mentioned before Changed Block Tracking (CBT) needs to be enabled for all VMs to minimize the transferred data size. To enable CBT, the virtual machine must be powered off. In the web interface of vSphere Hypervisor under Virtual Machine -> "desired VM" -> Edit -> VM Options -> Advanced -> Edit Configuration... add the two parameters listed in the subsequent table.
| Parameter | Value |
|---|---|
ctkEnabled |
TRUE |
scsi0:0.ctkEnabled |
TRUE |
After entering both parameters, the configuration should look like the following figure.
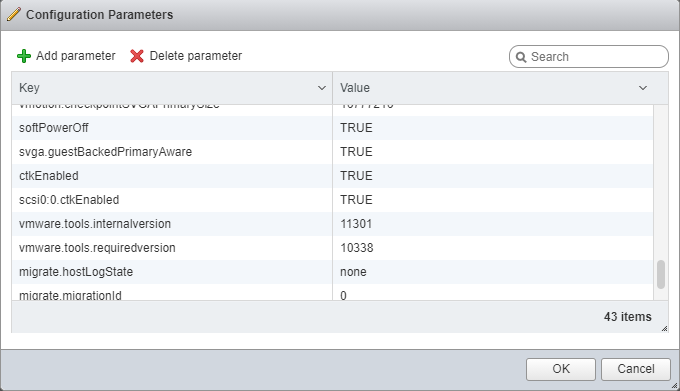
scsi0:0 in scsi0:0.ctkEnabled refers to the SCSI device associated with the hard disk. These settings can be found in the virtual hardware settings. If multiple disks are configured for the VM, then CBT must be enabled separately for all of them e.g.: scsi0:0 and scsi0:1, ….
Running the Backup Manually
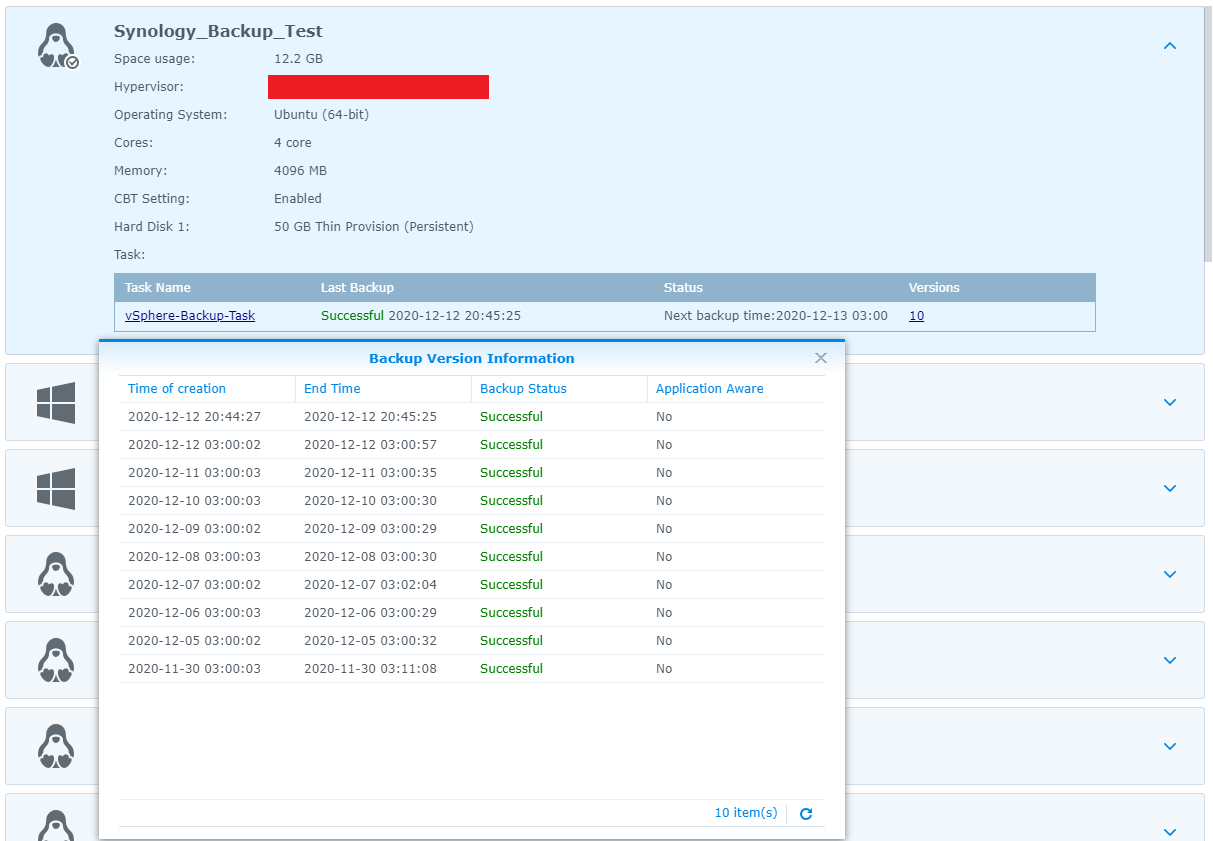
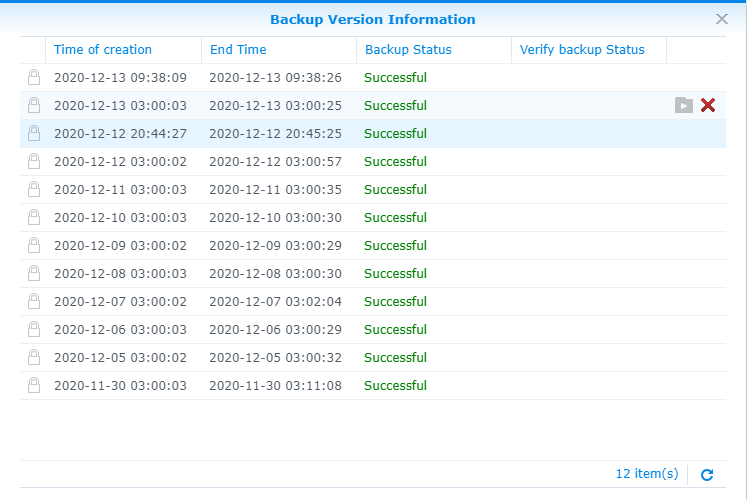
Now we are ready to run the first backup manually. To do so click the Back up button in the task list of Active Backup for Business. The progress is shown in the task list as well as on the start page of Active Backup for Business. All backup versions can be found by selecting a virtual machine under Virtual Machine -> "desired VM" -> number of versions as shown in the next figure.
To delete a backup from the task list, go to Virtual Machine -> Task List -> "desired Task" -> Version -> "desired Version" where a red X should appear as shown in the subsequent figure. This will remove the selected snapshots of all VMs from the task list. It is not possible to delete a backup version from a single virtual machine within the task list.
Restoring the Data
This section covers the recovery process of a virtual machine. The following strategies are examined in more detail.
- Instant Restore: Restore a VM by mounting the backup image directly to minimize the system downtime. This method may limit the performance of the VM due to limitations in the network.
- Full Virtual Machine Restore: Restore a VM by copying the backup image to the hypervisor. This method takes more time, but provides full I/O performance when completed.
- File and Folder Restore: Restore single files and folders from a backup image. The virtual machine itself is not restored during the process.
It is also possible to restore the VM by running it on the Synology Diskstation itself using Virtual Machine Manager (VMM). I have not planned to do that because of the limited resources of the Synology hardware.
Instant Restore
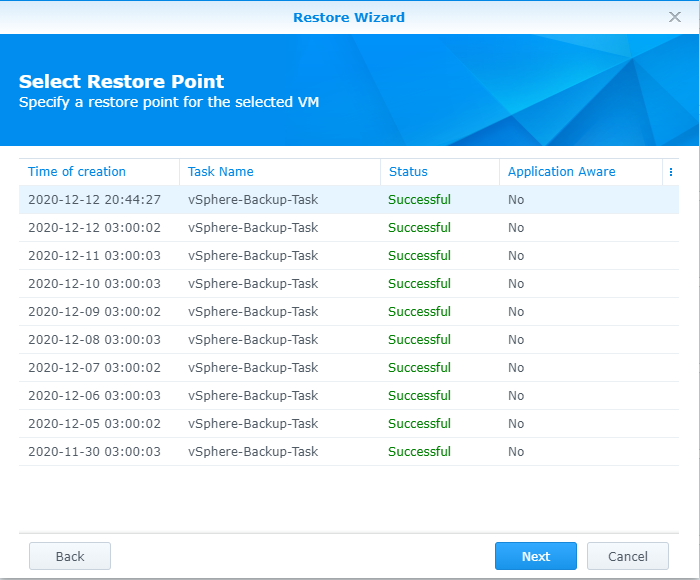
The instant VM restore is performed by selecting the desired VM under Virtual Machine and clicking the Restore button and selecting VMware vSphere as restore platform. Next, Instant Restore is selected as restore type and the version to be restored.
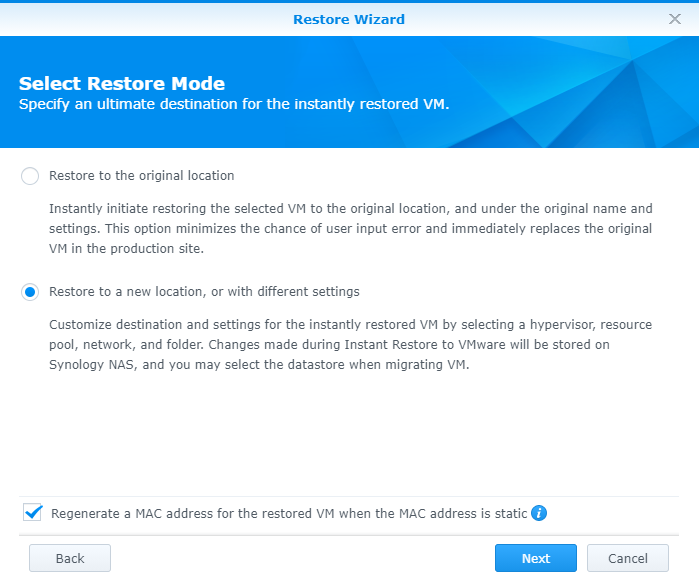
Under Restore Mode a new location is selected and the checkbox to regenerate the MAC address is enabled.
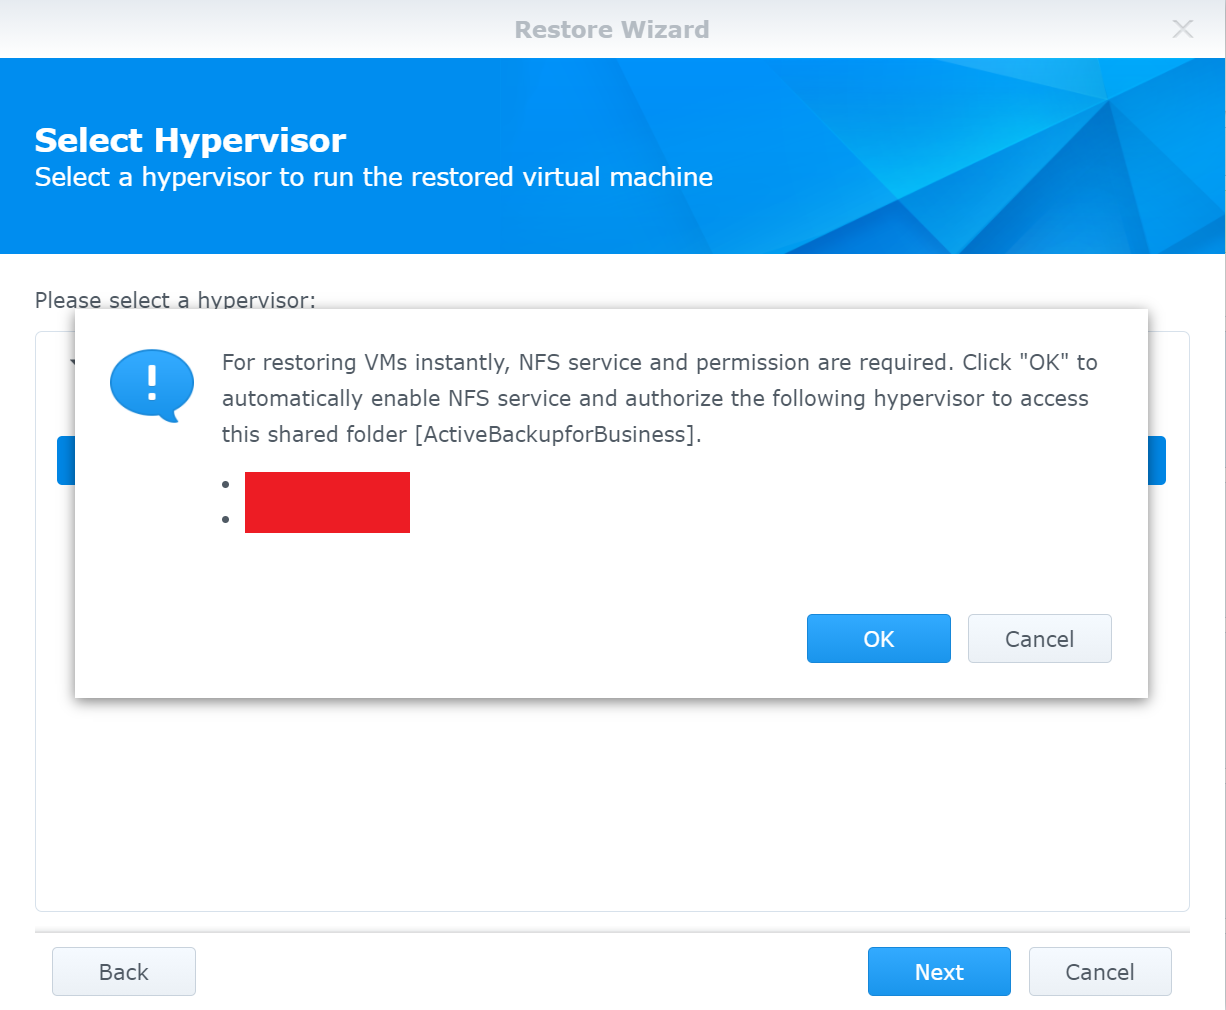
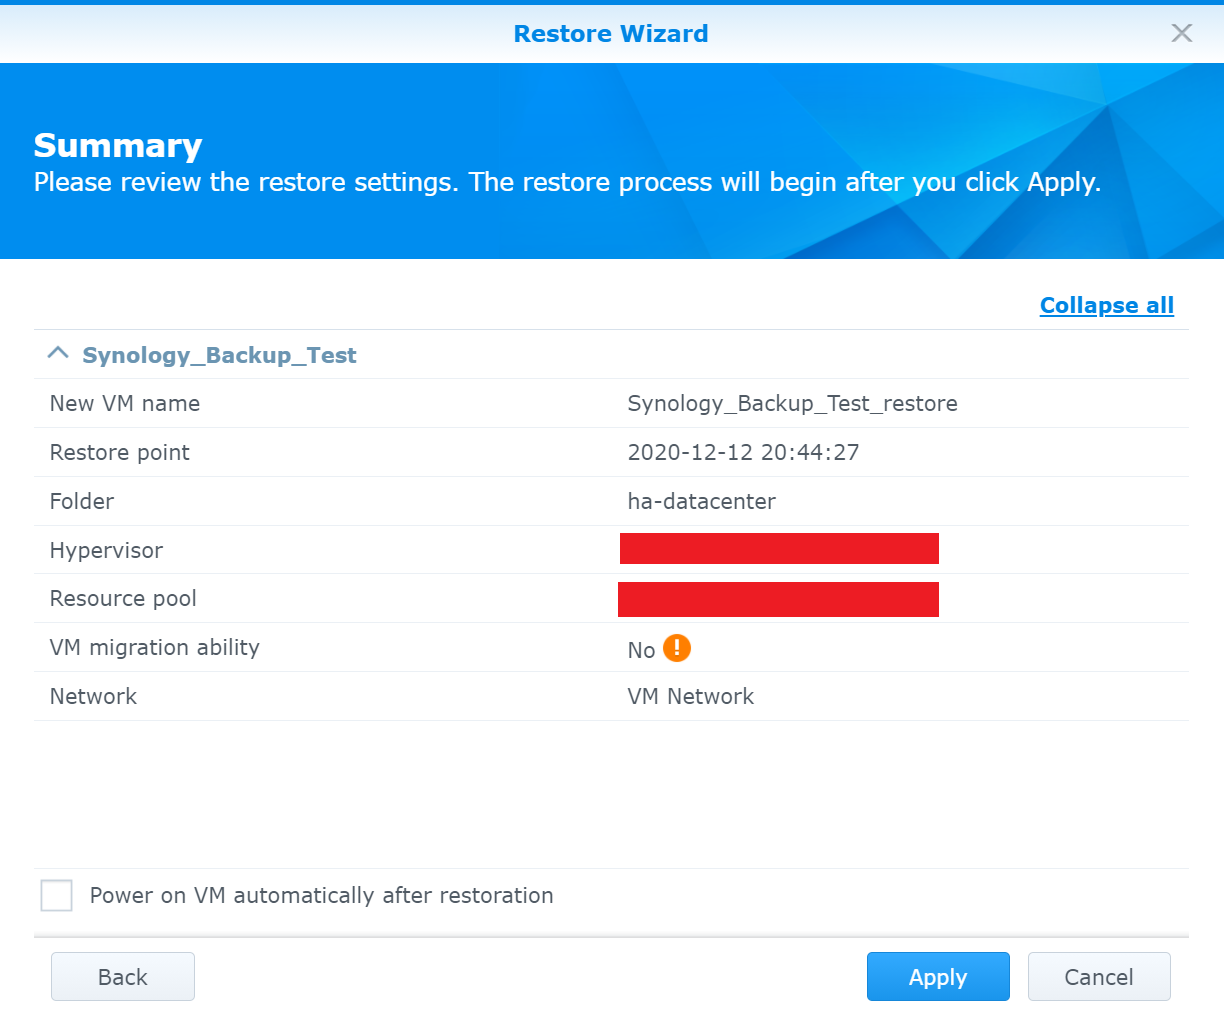
Then a new virtual machine name, the hypervisor and the folder where the machine should be restored are entered. The necessary privileges for the NFS share can be granted automatically. It seems that by default, NFS permissions are granted to all available and used network interfaces of the vSphere Hypervisor. The second interface is in fact a 10GbE connection to a dedicated data storage server for VMs which is located in a different subnet and thus no connection to the Diskstation is possible for this interface. The incorrectly configured NFS permissions may be modified or deleted in the shared folder settings.
Next, the default VM network interface is selected. If everything on the summary page is ok, the recovery process is started by clicking the Apply button. Then the restore status is displayed and when it is done, we can go to the vSphere web interface and start the virtual machine.
Full Virtual Machine Restore
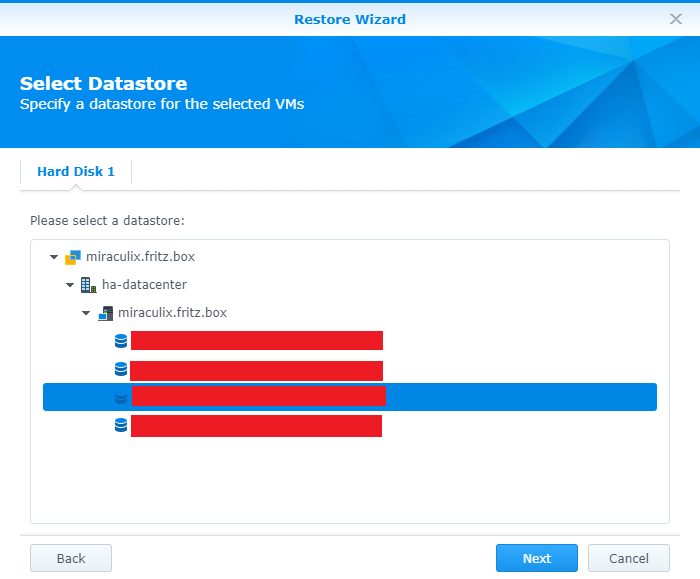
The procedure for the full virtual machine recovery is equivalent to the instant recovery described previously. During the restore wizard we select Full Virtual Machine Restore instead of Instant Restore. Furthermore, the datastore must be defined where the VM should be copied to. The recovery wizard lists all possible locations as they are configured in the vSphere environment.
File and Folder Restore
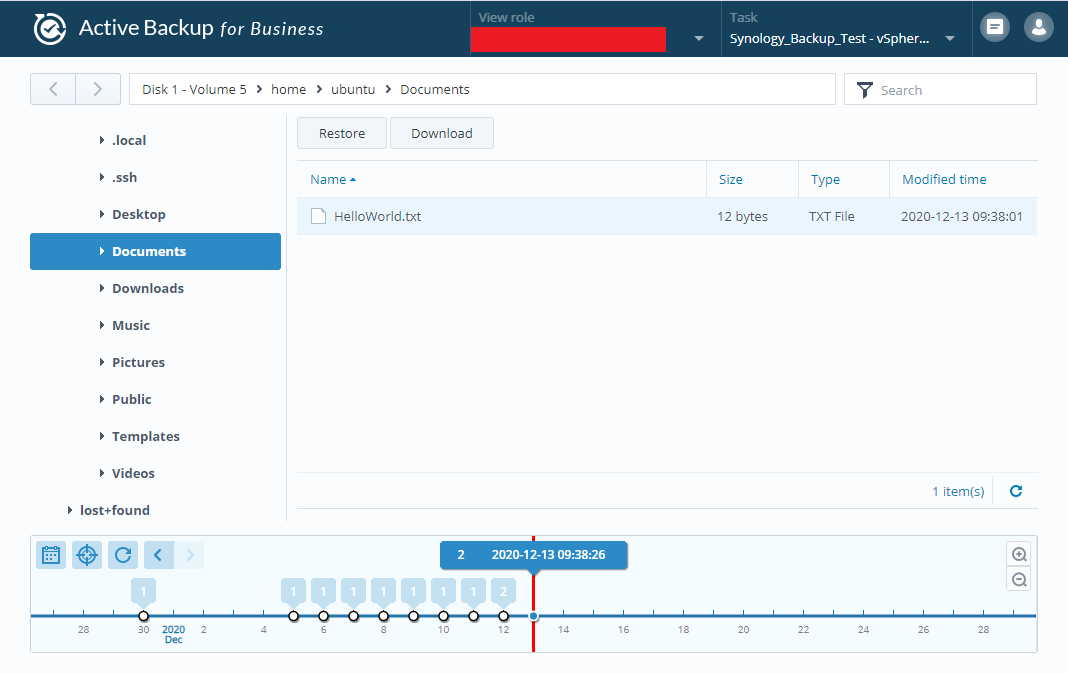
The last method deals with restoring files and folders located on the virtual machine. This is especially convenient if only one file and not the entire VM should be restored. For this purpose, Active Backup for Business Portal is used, that comes with the basic installation of the main package. For the free vSphere Hypervisor version (ESXi), the restore feature is unfortunately not available. This method would restore the files in the virtual machine itself. However, the data can be restored at any time by downloading them trough the portal.
Conclusions
Backing up virtual machines is an essential part of any backup strategy for state-of-the-art IT infrastructure. The recovery by setting up each VM manually would cost a lot of time and effort. In this post we have seen how Active Backup for Business from Synology can be used to backup and restore virtual machines running on VMware vSphere Hypervisor. Initial tests have shown that the proposed setup works fast and reliable. In near future more and more VMs will be added to the backup task. One point that cannot be ignored is the increased storage usage on the Diskstation. An expansion of the hard disk space is therefore necessary, since the VMs on the virtualization servers already occupy a few terabytes. Unfortunately, the backups cannot be performed directly to USB drives connected to the Diskstation. This would be a simple, cost-effective and extensible solution, as backup speed is not the most important requirement.
Consideration should also be given to extending the backup according to the 3-2-1 backup rule.
- Three copies means that in addition to the primary data, there should be at least two other backups.
- Two mediums means that two copies should be stored on at least two different storage types.
- One external location means keeping one copy physically separate from each other.
Also, the backup should be restored from time to time for testing purposes to see if it would work in an emergency. The best backup strategy is worthless if the data cannot be restored.