Until today, I daily backup my data to an external USB drive connected to my NAS. This is a good solution to avoid accidentally deleting of files and have somehow a version control. But it doesn’t protect my data against a local incident like fire or flood. If I want to avoid such harm I must store the data somewhere else.
In the last years cloud storage has become cheaper and cheaper. As for example all Swisscom customer with the inOne Mobile or inOne Home subscription get unlimited online storage in the Swisscom myCloud. To avoid access from the cloud provider to my data, all folders and files which I backup, must be encrypted on a local machine before uploading. Since the upload speed at home is limited, I must use an encryption based on file level. This has the disadvantage compared to a full disk encryption, that the file structure and the file size is visible for the cloud provider.
Setup
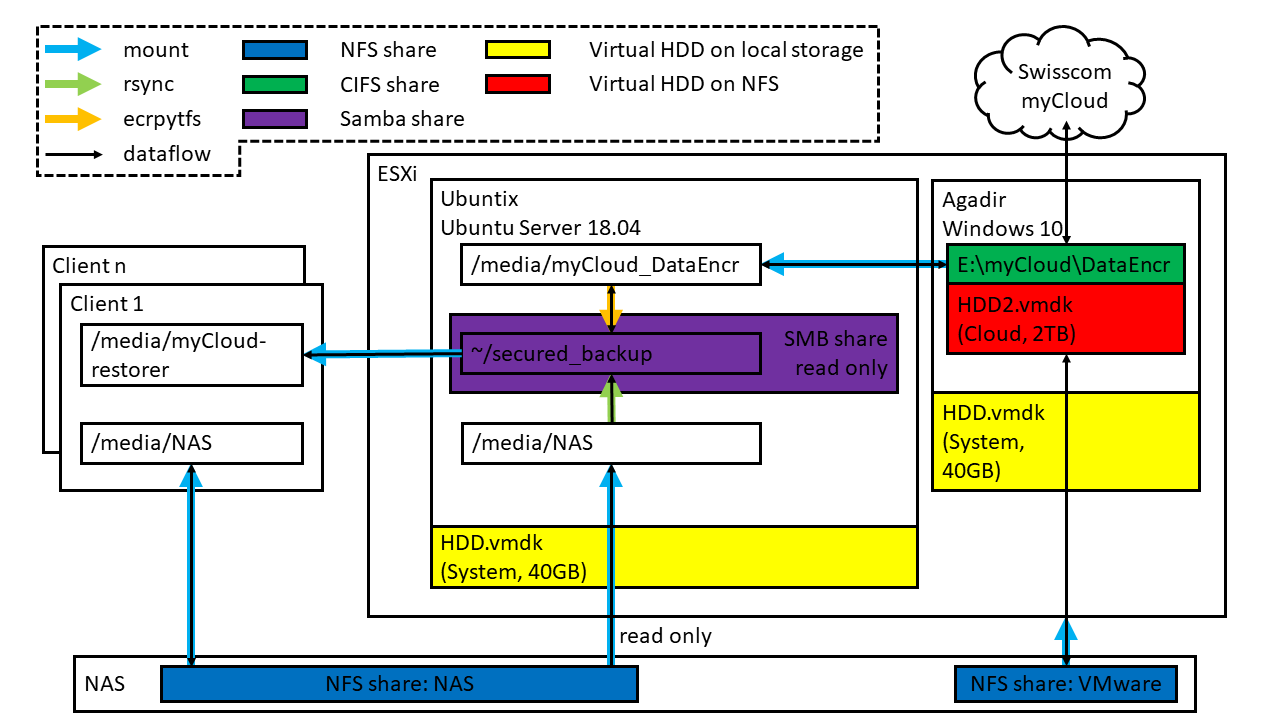
The setup is implemented on two virtual machines running on my ESXi server. One machine is running Windows 10 for the myCloud Desktop client, the other is running Ubuntu Server 18.04 for encrypting the data and run a daily backup with rsync. The VMs should use as less as possible of the fast and expensive local HDD storage of the ESXi server. To achieve this, the storage space for the encrypted data will be located on a NFS share on the NAS, mounted by the ESXi server.
To be able, to easily recover any data, the non-encrypted files are made available through the Samba server running on the Linux VM. The Samba share is configured to read only, to avoid accidentally manipulation of the backed-up files by myself.
Prepare the Windows system
I was not able to install the myCloud Desktop client on my Windows Server 2016 VM, thus I installed a Windows 10 VM on a virtual 40GB HDD. Once installed the OS, I removed all unnecessary, preinstalled “apps” with the following command.
Get-AppxPackage -AllUsers | Remove-AppxPackage
Then I added a second virtual HDD located on a slow NFS share on my NAS. This HDD is for storing the encrypted data which will by synchronized by the MyCloud Desktop client to the cloud. In the myCloud Desktop settings I change the storage location to the second HDD. Then I create the folder DataEncr on the synched folder and enable network filesharing for this folder.
Further I turned of auto-updates and auto-reboot.
Prepare the Linux system
As Linux system I use Ubuntu Server 18.04. This VM is also installed on a local 40GB HDD.
To configure a static IP address under 18.04 I have made the following settings in the file /etc/netplan/50-cloud-init.yaml. This will change the IP address to 172.16.1.130.
network:
    version: 2
    renderer: networkd
    ethernets:
        ens32:
            dhcp4: false
            dhcp6: false
            optional: false
            addresses: [172.16.1.130/24]
            gateway4: 172.16.1.1
            nameservers:
                addresses: [172.16.1.1]
                search: [fritz.box]
First, I installed the necessary software.
sudo apt-get install nfs-common cifs-utils ecryptfs-utils
Then I created the folders for mounting the external file systems.
sudo mkdir /media/NAS
sudo mkdir /media/myCloud_DataEncr
sudo mkdir /home/ubuntix/secured_backup
To mount the DataEncr and the NAS automatically at bootup I added the following liens to /etc/fstab.
//agadir/DataEncr /media/myCloud_DataEncr cifs uid=ubuntix,credentials=/home/ubuntix/.smbcredentials,_netdev 0 0
diskstation:/volume1/NAS_backuped /media/NAS nfs defaults 0 0
Then I created the file ~/.smbcredentials and added the following lines with my username and password from the DataEncr share of the Windows 10 machine.
username=<username>
password=<password>
Encryption
To encrypt my files, I use ecryptfs (enterprise-class cryptographic filesystem) because it allows file based encryption, it is POSIX-compliant and part of the Linux kernel.
First, I will generate a strong passphrase with 64 characters for ecryptfs. Avoid the character = it would later make troubles with the passphrase file.
</dev/urandom tr -dc 'A-Za-z0-9!"#$%&'\''()*+,-./:;<>?@[\]^_`{|}~' | head -c 64  ; echo
<64_char_long_password>
Now it is time to apply the encryption. I use a different path for the cloud folder (/media/myCloud_DataEncr) and the encrypted backup folder (/home/ubuntix/secured_backup). If once the encryption would not work, then I couldn’t accidentally upload unencrypted files to the cloud. Below you can see my settings, I enabled the filename encryption. This makes it more difficult for the cloud provider to do some data mining on my backup, since they only see the structure (folder vs. file) and file size.
sudo mount -t ecryptfs /media/myCloud_DataEncr /home/ubuntix/secured_backup
Passphrase:
Select cipher:
 1) aes: blocksize = 16; min keysize = 16; max keysize = 32
 2) blowfish: blocksize = 8; min keysize = 16; max keysize = 56
 3) des3_ede: blocksize = 8; min keysize = 24; max keysize = 24
 4) twofish: blocksize = 16; min keysize = 16; max keysize = 32
 5) cast6: blocksize = 16; min keysize = 16; max keysize = 32
 6) cast5: blocksize = 8; min keysize = 5; max keysize = 16
Selection [aes]:
Select key bytes:
 1) 16
 2) 32
 3) 24
Selection [16]: 32
Enable plaintext passthrough (y/n) [n]:
Enable filename encryption (y/n) [n]: y
Filename Encryption Key (FNEK) Signature [<signature>]:
Attempting to mount with the following options:
  ecryptfs_unlink_sigs
  ecryptfs_fnek_sig=<signature>
  ecryptfs_key_bytes=32
  ecryptfs_cipher=aes
  ecryptfs_sig=<signature>
WARNING: Based on the contents of [/root/.ecryptfs/sig-cache.txt],
it looks like you have never mounted with this key
before. This could mean that you have typed your
passphrase wrong.

Would you like to proceed with the mount (yes/no)? : yes
Would you like to append sig [<signature>] to
[/root/.ecryptfs/sig-cache.txt]
in order to avoid this warning in the future (yes/no)? : yes
Successfully appended new sig to user sig cache file
Mounted eCryptfs
To decrypt and mount the file systems automatically at bootup, I stored the passphrase according to the following line in the file /home/ubuntix/.ecryptfs/.secret-passphrase.key.
passphrase_passwd=<64_char_long_password>
The settings to decrypt the folder /home/ubuntix/secured_backup are stored in the file /root/.ecryptfsrc. I added the following lines to this file and adjusted ecryptfs_fnek_sig and ecryptfs_sigto the signature in /root/.ecryptfs/sig-cache.txt.
key=passphrase:passphrase_passwd_file=/home/ubuntix/.ecryptfs/.secret-passphrase.key
ecryptfs_fnek_sig=<signature>
ecryptfs_sig=<signature>
ecryptfs_cipher=aes
ecryptfs_key_bytes=32
ecryptfs_passthrough=n
ecryptfs_enable_filename_crypto=y
Now it is time to test if the decryption and mount is working. I first unmount the encrypted directory
sudo umount /home/ubuntix/secured_backup
and then I try to decrypt and mount the folder /home/ubuntix/secured_backup. The output should look similar to mine.
sudo mount -t ecryptfs /media/myCloud_DataEncr /home/ubuntix/secured_backup
Attempting to mount with the following options:
  ecryptfs_unlink_sigs
  ecryptfs_fnek_sig=<signature>
  ecryptfs_key_bytes=32
  ecryptfs_cipher=aes
  ecryptfs_sig=<signature>
Mounted eCryptfs
If it is successfull, add the following line to /etc/fstab to decrypt and mount the cloud folder automatically at bootup.
/media/myCloud_DataEncr /home/ubuntix/secured_backup ecryptfs _netdev 0 0
Now I want to test if everything is OK. For this, I unmount all file systems and try to mount everything automatically from the /etc/fstab.
sudo umount /home/ubuntix/secured_backup
sudo umount /media/NAS
sudo umount /media/myCloud_DataEncr
sudo mount -a
To test if it is syncing the encrypted data to the cloud i create a file and a folder in the directory secured_backup
touch ~/secured_backup/file.txt
echo "First Line" >> ~/secured_backup/file.txt
mkdir ~/secured_backup/folder
If everything works we can try to restart the linux server and check if the file and folder still exists and are readable. In the cloud however, we should not be able to read the folder and file name. Further it should not be possible to read the content of a file.
Backup script
Since I want to use rsync to backup my data, I create the file /usr/local/bin/rsync_script and add the following lines. This script will simply copy the content from SOURCE to TARGET except the folder #recycle and its content.
#!/bin/sh

SOURCES="/media/NAS"
TARGET="/home/ubuntix/secured_backup"

rsync -av --exclude=[#]recycle $SOURCES $TARGET
Then I make the file executable and run it to test if it is working.
sudo chmod +x /usr/local/bin/rsync_script
sudo /usr/local/bin/rsync_script
Automatic backup
For the automatic backup the backup script must be called every day. I added the following line to crontab to run the script rsync_script automatically at 01:00.
00 01 * * * /usr/local/bin/rsync_script
Restoring data
To be able to restore data, a samba server is installed on the Linux system. With the following line we can install the necessary packages.
sudo apt-get install samba-common samba
I create the new user cloud-restorer without a home directory and without the possibility to login to the system neither local nor over ssh.
sudo adduser --no-create-home --disabled-login --shell /bin/false cloud-restorer
The new user must be added to the user database of samba. The command below adds and activates the user.
sudo smbpasswd -a cloud-restorer
In the file /etc/samba/smb.conf I add the following lines. The user cloud-restorer has read only access to the share.
[myCloud-restorer]
   public = no
   read only = yes
   path = /home/ubuntix/secured_backup
   valid users = cloud-restorer
With the following command we can test if the settings are OK.
testparm /etc/samba/smb.conf
Now we can restart the samba server with the following command.
sudo service smbd restart
Restoring data from scratch
In the worst case the NAS and the ESXi server would be destroyed. Then, I would have to install everything again on other hardware, download the encrypted data from the cloud and decrypt it. For backups it is essential to always be able to restore the data, otherwise the entire backup is worthless. Before using this setup in production, I must test, if I am able to restore the data with nothing more than the passwords for cryptfs.
In this section I try to restore the data on a new, similar installed Linux server. First, I create two folders. /media/recovery is for the encrypted data from the cloud and ~/recovery_decrypted is for the decrypted data.
sudo mkdir /media/recovery
sudo mkdir ~/recovery_decrypted
Then create the file ~/.smbcredentials with the same content as for the backup-server. And finally, I add the following line to /etc/fstab. Here I give read only right to prevent any manipulation of the files by the backup-test-server.
//agadir/DataEncr /media/recovery cifs ro,uid=mingzhi,credentials=/home/mingzhi/.smbcredentials,_netdev 0 0
Now it is time to decrypt the data. If everything is OK, we can find the decrypted and readable files in ~/recovery_decrypted.
sudo mount -t ecryptfs /media/recovery /home/mingzhi/recovery_decrypted
For the future, I can imagine to setting up a second Linux VM where I can do a monthly test to restore the data. I could make a snapshot of the VM with the base installation of Linux. After a restart I could automatically revert the machine to the initial state. With a script I could automatically test if the restoring of the data is successfully.
Conclusions
We have seen that today an encrypted cloud backup is realizable. The setup becomes much more complicated if there exist no Linux implementation of the cloud client as we have seen in this project.
In case that Swisscom will limit the storage space or shut down myCloud I can quickly change the cloud part to another provider. This happened to me already once with wuala, when they stopped their peer-to-peer approach to earn cloud storage.
Since I am using an encryption on file level, the cloud provider can still see the file structure with file size and editing date. I must accept this disadvantage because with a full disk encryption I would have to upload every day the entire disk even though only one bit in a single file has changed. This would not be possible with my limited upload speed and secondly by the limitation of the maximum file size of 3GB by the cloud provider.
It would be better to separate the VMware NFS share and the NAS data because they are located on the same hardware. In case of a failure of the NAS the ESXi host would not be able to mount the VMware NFS share and therefore the HDD2.vmdk for the myCloud client would be missing.
If an update of the NAS requires a restart, then I have first to shutdown the Linux machine and then the Windows. When the NAS is running again, I can start the Windows and then the Linux machine.